After a long wait, Linux Mint 19 – code named Tara is finally released. Details of the release are on the page –> https://blog.linuxmint.com/?p=3597 and I have downloaded the Cinnamon Desktop ISO from the torrent page –> https://torrents.linuxmint.com/torrents/linuxmint-19-cinnamon-64bit.iso.torrent
I am already using Linux Mint 18.3 (Sylvia) Cinnamon running on Desktop Parallels on my Macbook Pro and I wanted to upgrade to Tara. Upgrade instructions are on the following page –> https://community.linuxmint.com/tutorial/view/2416
There are couple of things I noted on this page
- Linux Mint 18.3 will be supported till year 2021
- Did you try Linux Mint 19 ?
Hence I wanted to first try installing Linux Mint 19 as a separate parallels installation before upgrade. I installed the usual way as described in an earlier blog –> https://teaslegourd.wordpress.com/2016/07/03/installing-linux-mint-18-cinnamon-sarah-on-macbook-pro/
However, when I tried first step post installation i.e., Parallels tools installation, it failed surprisingly. Disappointed, I searched for solution but could not find any at this point. Looks like there is no support currently for Ubuntu version on which Mint is built.
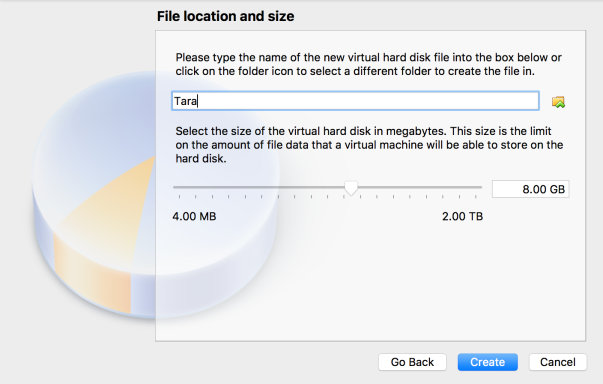
Hence installed Linux Mint 19 on Virtual Box.
Oracle Virtual Box is a VM software similar to Desktop Parallels. It is free to download from https://www.virtualbox.org/
Please note in the below images, the Hard disk size selected is 90 GB in my case (not 8 GB as Mint needs more than 10 GB)


Now its time to try Fresh Linux Mint and explore the new features.
Once I tried the new features, it is time to install my required software:
Step 1: Go to Update Manager and install all the suggested updates
Step 2: My required software
WordPress app
The app I use to write and publish my blogs (teaslegourd.wordpress.com). Download the app for linux (.deb) from –> https://apps.wordpress.com/desktop/ and install using package manager.
Iridium Browser
I prefer Iridium brower over Firefox. Install the browser from the site https://iridiumbrowser.de/downloads/debian
wget -qO - https://downloads.iridiumbrowser.de/ubuntu/iridium-release-sign-01.pub|sudo apt-key add -
cat <
Once Iridium is installed, open the browser, go to setting and make Qwant search engine as default page –> https://www.qwant.com/
I also removed Firefox browser from the Software Manager. If required, it can be installed later.
Plank Dock
sudo add-apt-repository ppa:docky-core/stable
sudo apt-get update
sudo apt-get install plank
After installing to set preferences,use terminal and run
plank --preferences
Anaconda Python Distribution
Goto the following page https://www.anaconda.com/download/#linux and download the installer for Linux. I have downloaded Python 3.x version.
Goto terminal and run
sh Anaconda3-5.2.0-Linux-x86_64.sh
In order to add desktop entry (short cut) to Anaconda Navigator, add the below code to a new file Anaconda in /usr/share/applications/
[Desktop Entry]
Version=1.0
Type=Application
Name=Anaconda-Navigator
GenericName=Anaconda
Comment=Scientific PYthon Development EnviRonment – Python3
Exec=bash -c ‘export PATH=”/home/srinivas/anaconda3/bin:$PATH” && /home/srinivas/anaconda3/bin/anaconda-navigator’
Categories=Development;Science;IDE;Qt;Education;
Icon=/home/srinivas/anaconda3/Anaconda.png
Terminal=false
StartupNotify=true
Name[en_IN]=Anaconda
In order to update Anaconda, use the commands from terminal
conda update conda
conda update anaconda orconda update --all
Anaconda has in-built tools like Spyder Developement Environment and Orange Data Mining. We can create similar desktop entries for these as well and add them to plank.
Application paths:
Spyder -> anaconda3/bin/spyder
Orange -> anaconda3/bin/orange-canvas
Qt ->anaconda3/bin/designer
Icons: search in anaconda3/pkgs/ for png file
Sqlite Studio
Can be downloaded from the page -> https://sqlitestudio.pl/index.rvt Download the Linux (installer)
Pycharm Community Edition
Can be downloaded from https://www.jetbrains.com/pycharm/download/#section=linux
Installation Instructions as mentioned in the site:

Unpack the pycharm.tar.gz using the following command:
tar -xzf pycharm.tar.gz and run pycharm.sh from the bin subdirectory
MongoDB Community Edition
Follow instructions from the page -> https://docs.mongodb.com/manual/tutorial/install-mongodb-on-ubuntu/#install-mongodb-community-edition
Robo 3T (Formerly RoboMongo)
Can be downloaded from -> https://robomongo.org/download
Moving files from Mac to VirtualBox
Go to Mac –> System Preferences –> Sharing –> check fil sharing. Under options, check ‘Share Files using SMB’ and ‘Share files using AFP’ as well as user
Note the IP address (aaa.bbb.c.d)
When Logged onto Mint, type smb://aaa.bbb.c.d.
Variety (Automatically changes wallpaper)
sudo add-apt-repository ppa:peterlevi/ppa
sudo apt-get update
sudo apt-get install variety

Hi.
I have an old macbook pro 2012.
Have you tried installing linux mint in same hard drive ie … can you dual boot with either MacOS or Mint Linux? Or you’re only running your linux system via a virtual machine?
LikeLike
Hello, I am running as a virtual machine. Did not try dual boot
LikeLike